Category Archives: unix

Red Hat Virtualization (RHEV-H) price and feature comparison

I’ve been putting together a very rough and ready comparison of the price and listed functionality of Redhat’s new RHEV-H virtualization platform, based on KVM with a small footprint version of Redhat’s enterprise Linux system, all wrapped up with a Windows-based management client.

I say “listed functionality” because Red Hat are the only x86 virtualization platform developers that I can think of that don’t even let you quickly download a version of their software, slightly ironic given that they’re an open-source developer and their competitors VMware, Microsoft and Citrix are all historically closed-source companies, though Citrix have open-sourced their base XenServer virtualization system.

Assuming I can get a trial version of RHEV-H and it’s management client, I’ll write a new post giving you my experiences with it in comparison to VMware vSphere.

On paper, RHEV-H is a pretty functional product, supporting:

• High availability – failover between physical servers
• Live migration – online movement of VM’s between physical hosts without interruption
• System scheduler – dynamic live migration between physical hosts based on physical resource availability
• Maintenance manager
• Image management
• Monitoring and reporting

These are the major components of a virtualization platform, indeed live migration and the system scheduler are high-end features on the other virtualization platforms, so for Red Hat to include in it’s “one-size-fits-all” package is a nice addition.

The major player in the virtualization arena is without a doubt VMware, and their vSphere Advanced product will deliver the functionality that pretty much any company would want, though the have an “Enterprise Plus” option which adds even more for larger corporations.

VMware vSphere Advanced includes:

  • VMware ESXi or VMware ESX (deployment-time choice)
  • VMware vStorage APIs / VMware Consolidated Backup (VCB)
  • VMware Update Manager
  • VMware High Availability (HA)
  • VMware vStorage Thin Provisioning
  • VMware VMotion™
  • VMware Hot Add
  • VMware Fault Tolerance
  • VMware Data Recovery
  • VMware vShield Zones

A lot of that functionality, especially the Fault Tolerance, vShield Zones and vStorage APIs simply aren’t matched in any other virtualisation platform right now, whatever the price. However, the vSphere Standard product misses out the VMotion and Fault Tolerance functionality along with thin-provisioning and data recovery features, which means that while it’s still an excellent product, it does mean more management overhead in the event of needing to arrange physical server downtime, etc.

Now to the prices, I’ve put together the list prices of RHEV-H and VMware vSphere Standard and Advanced, and put them below in a table and also a sample configuration based on 1 management server and 5 physical hosts, each with 2 sockets.

Because Tumblr doesn’t seem to let you embed a table, I’ve had to put the table as an image, sorry about that.

As you can see, RHEV-H is the cheapest software option of the 3, though the 3 year cost-benefit compared to vSphere Standard aren’t huge, especially when 24×7 support is included. vSphere Advanced costs significantly more, but delivers a lot more too, though it could be more than your own company needs.

Below are the full costs I’ve used to calculate the above results, please let me know if you think I’ve got anything wrong or missed anything out.
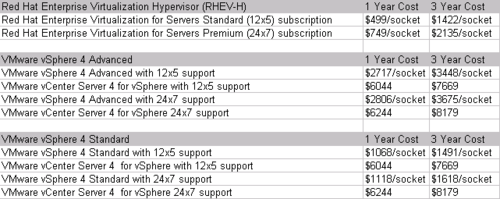
The prices above were taken from the VMware online store on 29th December 2009, and the Red Hat Virtualization Cost PDF, again on the 29th December 2009.

Overall, it looks like the pricing of Red Hat’s RHEV-H system makes it worth the effort of aquiring it and giving it a solid shakedown, but it’s not going to force VMware into radically changing their own pricing structure.

vSphere Advanced is streets ahead in terms of functionality, and the wide-spread adoption of VMware products in general means vSphere Standard may lack some of the functionality of RHEV-H but makes up for it in other areas, especially around the management and backup+restore side of virtualisation, where RHEV-H has a long way to go to catch up.

Getting Gluster working with 2-node replication on CentOS

Gluster is a fantastic open-source clustering filesystem, allowing you to convert low-cost Linux servers into a single highly available storage array.

The project has recently launched the “Gluster Storage Platform”, which integrates the Gluster filesystem with an operating system and management layer, but if you want to add Gluster functionality to your existing servers without turning them into dedicated storage appliances, the documentation is a bit lacking.

In an attempt to help anyone else out there to get Gluster up and running replicating a directory between 2 servers in Gluster’s “RAID 1” mode.

First of all, download the latest version of Gluster 3 from their FTP site, I downloaded 3.0.0-1, you’ll need the following files assuming you’re running CentOS:

glusterfs-client-3.0.0-1.x86_64.rpm

glusterfs-common-3.0.0-1.x86_64.rpm

glusterfs-server-3.0.0-1.x86_64.rpm

Once you’ve downloaded the 3 files to somewhere on your first node, run:

yum install libibverbs

rpm -ivh glusterfs-client-3.0.0-1.x86_64.rpm glusterfs-common-3.0.0-1.x86_64.rpm glusterfs-server-3.0.0-1.x86_64.rpm

To install the Gluster software itself. Then copy the RPM files to your second node, and repeat the rpm installation.

You’ll need to decide a directory on each server to act as the datastore, so either pick an existing directory or more likely create a new one – In this case I’ve used “/home/export”. If it doesn’t already exist, run

mkdir /home/export

Assuming you’re using 2 nodes, next run this command on the first node to produce the Gluster configuration files, replacing the words node1ip and node2ip with the IP addresses or hostnames of the 2 nodes, and /home/export with your directory.

glusterfs-volgen —name store1 —raid 1 node1ip:/home/export node2ip:/home/export

This will create 4 files

booster.fstab

store1-tcp.vol

node1ip-store1-export.vol

node2ip-store1-export.vol

Of these, booster.fstab is used for auto-mounting filesystems after reboots, so isn’t needed yet. Copy the store1-tcp.vol and node2ip-store1-export.vol files to the second node.

On the first node, run

cp node1ip-store1-export.vol /etc/glusterfs/glusterfsd.vol

cp store1-tcp.vol /etc/glusterfs/glusterfs.vol

On the second node, run

cp node2ip-store1-export.vol /etc/glusterfs/glusterfsd.vol

cp store1-tcp.vol /etc/glusterfs/glusterfs.vol

At this point, you should be ready to start the gluster services on both nodes, and mount the filesystems.

You need somewhere on the node to mount the replicated filesystem, In this case we’re using “/mnt/export”

On each node, run

service glusterfsd start
mount -t glusterfs /etc/glusterfs/glusterfs.vol /mnt/export/

You should now have a working Gluster replication service between the 2 nodes, you can test this by running on the first node

echo “Gluster is working” > /mnt/export/fileA

and on the second node run

cat /mnt/export/fileA

Assuming everything is working ok, you’ll see a message of “Gluster if working” on your screen.

If you don’t get that, then take a look in the /var/log/glusterfs/ directory on both nodes to see what’s happening.

One thing I’ve noticed is that gluster’s output logs in /var/log/glusterfs often start with a – at the front, confusing a lot of Unix command line tools – if you refer to them using their full path including /var/log/glusterfs, you’ll have an easier time manipulating them.

Hopefully this will help people out there with the slightly confusing but comprehensive Gluster documentation where I recommend you go for any more in-depth configuration help.

OpenNMS – the poor man’s network management tool, or the smart man’s?

About 5 years ago I came across OpenNMS, an attempt to build an open-source network management system, and found it was written in Java (so had to be slow), wasn’t very pretty (so didn’t look good in demos), and didn’t play very nicely with AIX (so was totally useless for my job at the time).

Fast forward 5 years, and OpenNMS has evolved into probably the best performing network management tool out there, all available for free from the OpenNMS website, and it’s even replacing existing Tivoli NetCool implementations which means it’s either very good, or everyone who knows NetCool has retired..